Connect an AI agent via MCP
How to get there: MCP is a per-portal endpoint. There is no admin screen to configure it. Point your MCP-compatible client at your portal's /mcp URL and it will discover everything else automatically. Step-by-step setup is below for Codex, Claude.ai, Claude Desktop, ChatGPT, Claude Code, Cursor, VS Code, Gemini CLI, Windsurf, Zed, Cline, and Goose.
ProductLift exposes a Model Context Protocol (MCP) server so AI agents can list, create, and update posts, comments, votes, statuses, categories, tags, and users on your portal on your behalf. Every call is authenticated as a real ProductLift user and is scoped to that user's permissions, just like the REST API.
Endpoint
Each portal serves its own MCP endpoint at:
https://your-portal.example.com/mcpThis is a single POST endpoint that speaks JSON-RPC 2.0. Batch requests are supported.
You do not need to hand-configure any tools. The client calls tools/list on connect and discovers every action available to your user.
Authentication
MCP uses OAuth 2.1 with PKCE and Dynamic Client Registration (RFC 7591). Any MCP-compliant client can register itself, redirect a portal admin to log in, and receive a bearer token scoped to mcp. You do not need to create an API key first.
Two discovery documents drive the flow. Clients fetch them automatically:
GET /.well-known/oauth-authorization-server: advertises the authorize, token, and registration endpoints, plus supported grant types (authorization_code,refresh_token) and theS256PKCE method.GET /.well-known/oauth-protected-resource: tells the client that the/mcpresource trusts this same portal to issue tokens.
Both documents advertise the current portal hostname, so custom domains work out of the box.
The OAuth flow, step by step
- The client fetches the two discovery documents from your portal.
- The client registers itself by
POSTing to/oauth/register(DCR). No pre-shared secret required. - The client opens the browser to
/oauth/authorize?...where you log in with your normal portal credentials and approve the connection. - The client exchanges the returned authorization code at
/oauth/tokenfor an access token with scopemcp. - Every subsequent MCP request includes
Authorization: Bearer <access_token>.
Setting it up in common clients
Every client below does the same thing: you paste your portal's /mcp URL, the client registers itself with your portal, and your browser opens so you can sign in and approve. Replace https://your-portal.example.com/mcp with your own portal URL (custom domains work).
Pick your client:
- Codex (ChatGPT desktop app, CLI, IDE extension)
- Claude.ai
- Claude Desktop
- ChatGPT
- Claude Code
- Cursor
- VS Code (GitHub Copilot)
- Gemini CLI
- Windsurf
- Zed
- Cline
- Goose
- Other MCP-compatible clients
A client must support the browser sign-in (the MCP OAuth flow) to connect. Your portal only issues MCP tokens through that sign-in screen, so clients that can only send a pasted token, such as GitHub Copilot CLI at the time of writing, cannot connect yet.
Codex
The ChatGPT desktop app, the Codex CLI, and the Codex IDE extension share one configuration file, so you only set this up once.
In the ChatGPT desktop app or the IDE extension:
- Open Settings (in the IDE extension: the gear menu) and choose MCP servers.
- Click Add server.
- Choose Streamable HTTP, name it
productlift, and pastehttps://your-portal.example.com/mcp. - Click Save, then Restart (Restart extension in the IDE).
- Codex opens your portal in the browser. Sign in with your normal portal credentials and approve the
mcpscope. If no browser window opens, runcodex mcp login productliftin a terminal.
From the terminal (Codex CLI):
codex mcp add productlift --url https://your-portal.example.com/mcp
codex mcp login productlift
The second command opens your browser for the sign-in. codex mcp list afterwards shows the server as connected.
Or edit the config file directly. Add this to ~/.codex/config.toml:
[mcp_servers.productlift]
url = "https://your-portal.example.com/mcp"
OAuth is Codex's default for streamable HTTP servers, and Codex registers itself with your portal automatically, so you do not need an auth line, a client ID, or a token. Run codex mcp login productlift once to sign in.
Claude.ai
-
In Claude.ai, open Settings → Connectors and click Add custom connector.
-
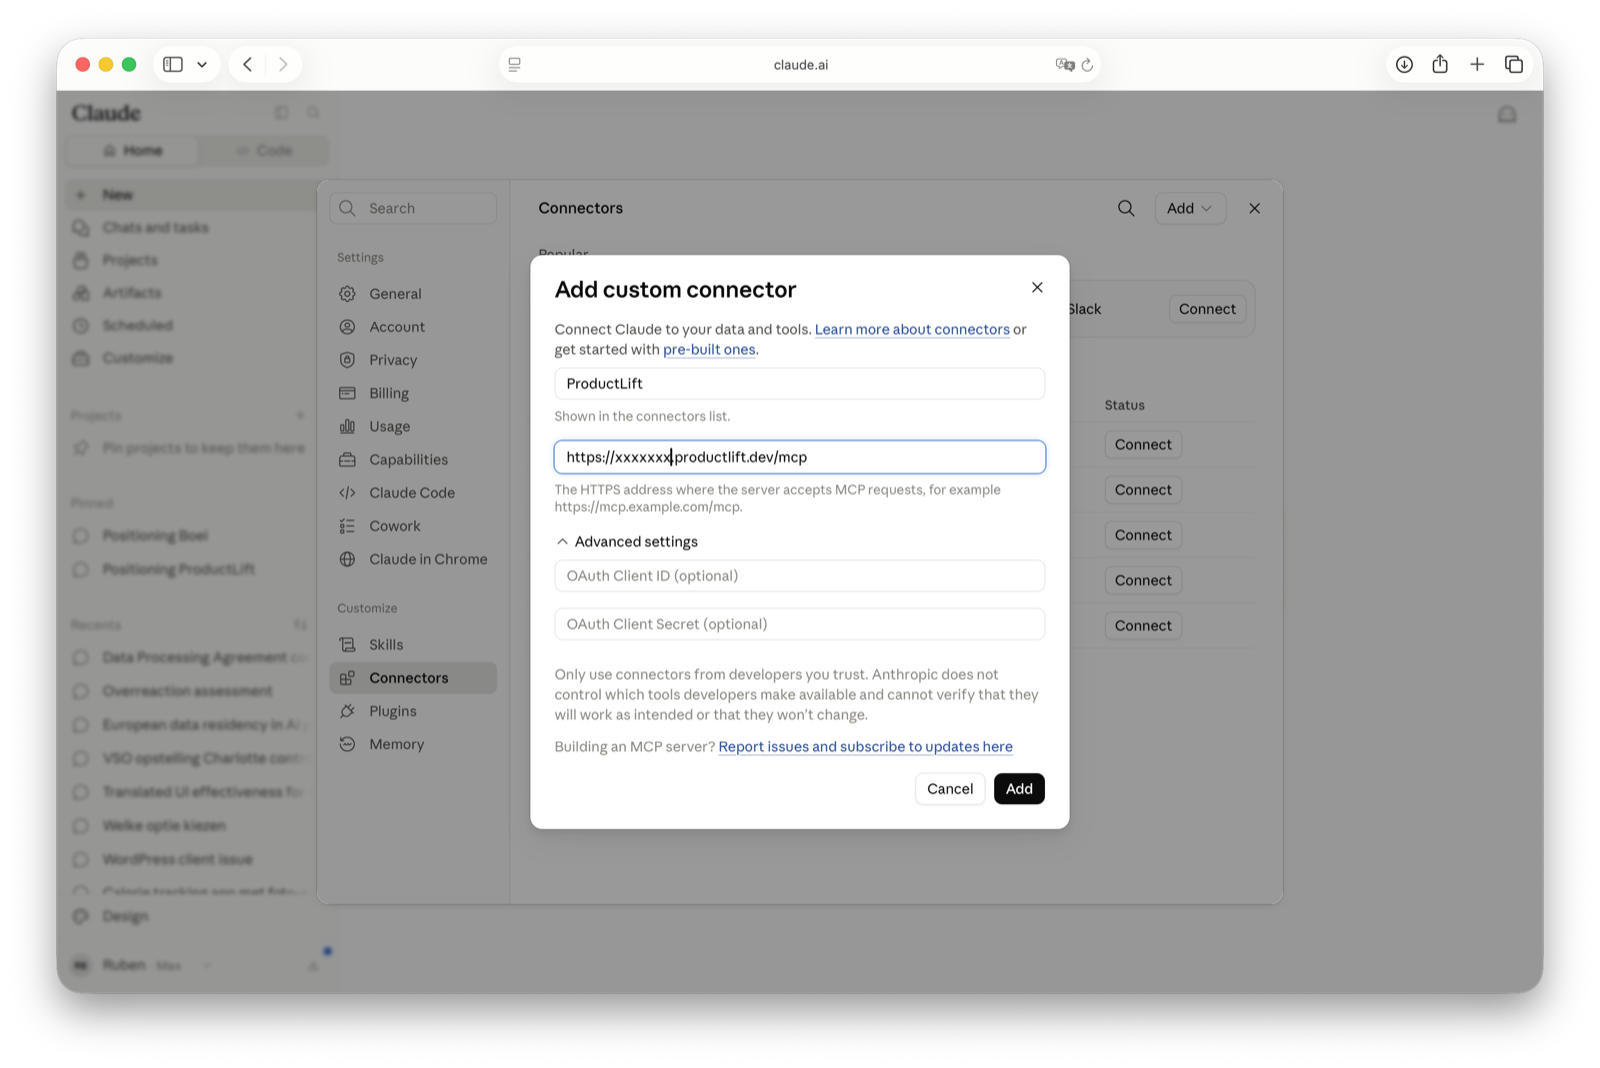
Give it a name, for example "ProductLift", and paste your portal's
/mcpURL, for examplehttps://your-portal.example.com/mcp.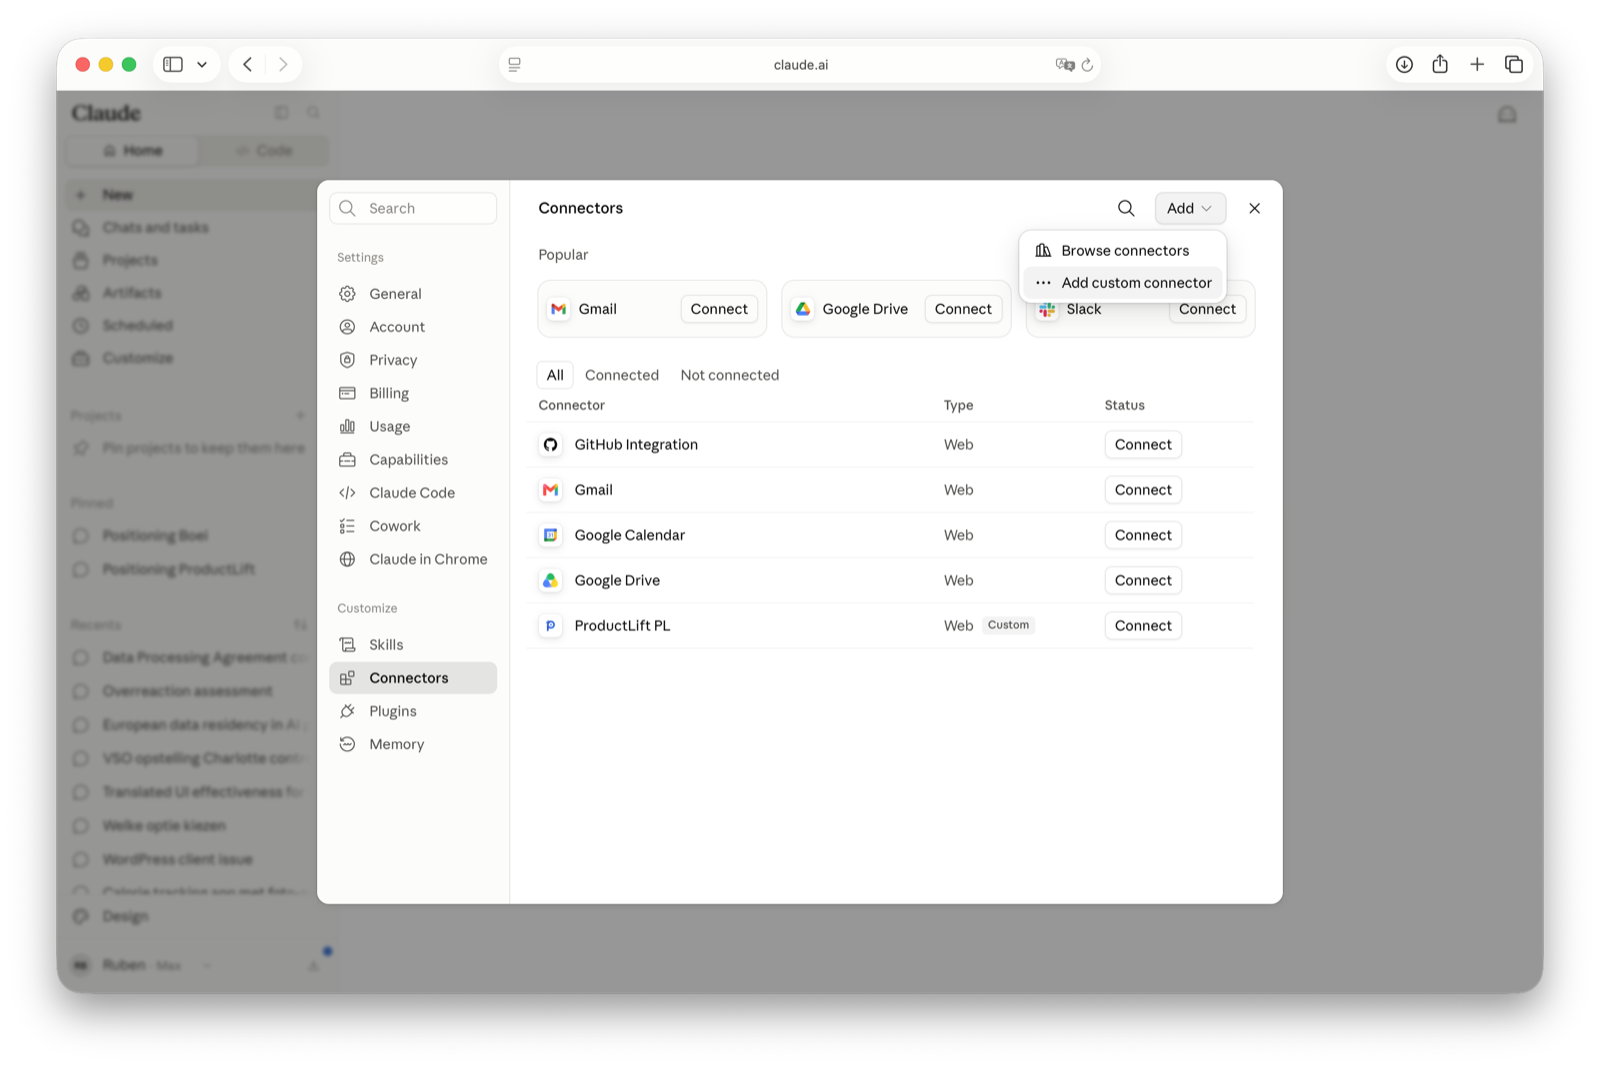
-
Two groups of settings appear, Authentication and OAuth client. Claude checks your portal and fills both in for you, marking its choices Detected. Leave them exactly as they are. You do not need to add any headers or open the Advanced section.
-
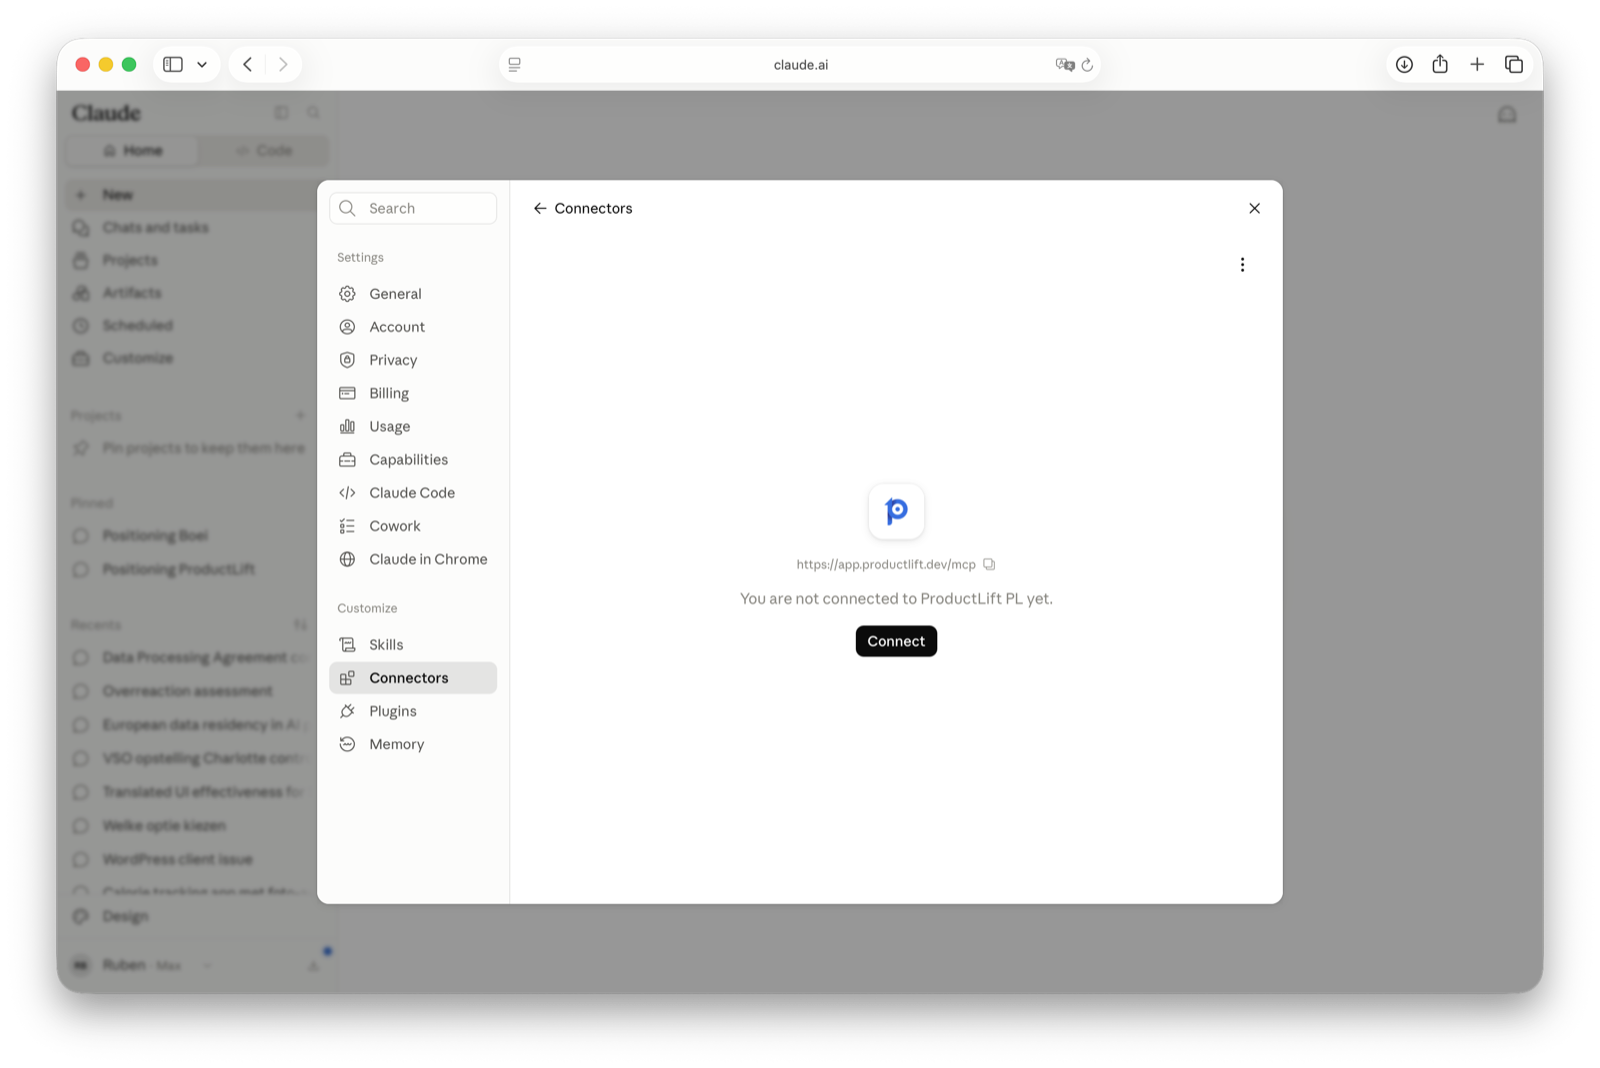
Click Add. ProductLift now appears in your connectors list as a Web connector.
-
Open it and click Connect.
-
A window opens on your portal. Sign in with your normal portal credentials if asked, then approve the requested
mcpscope.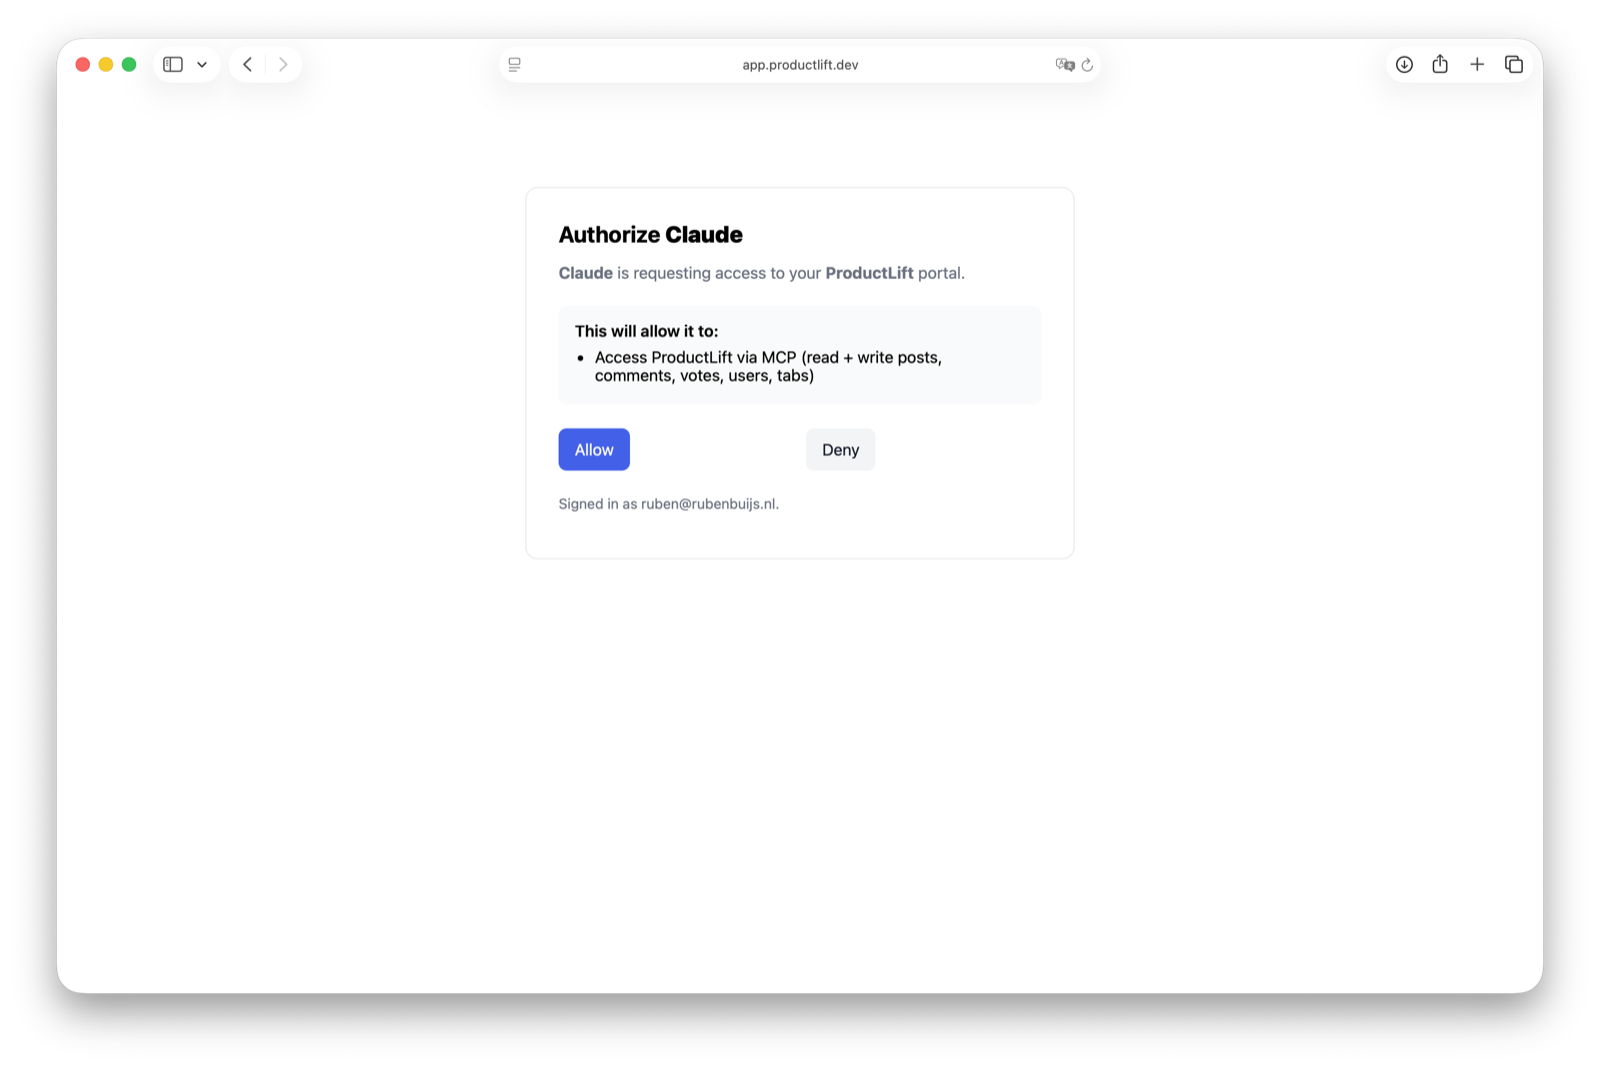
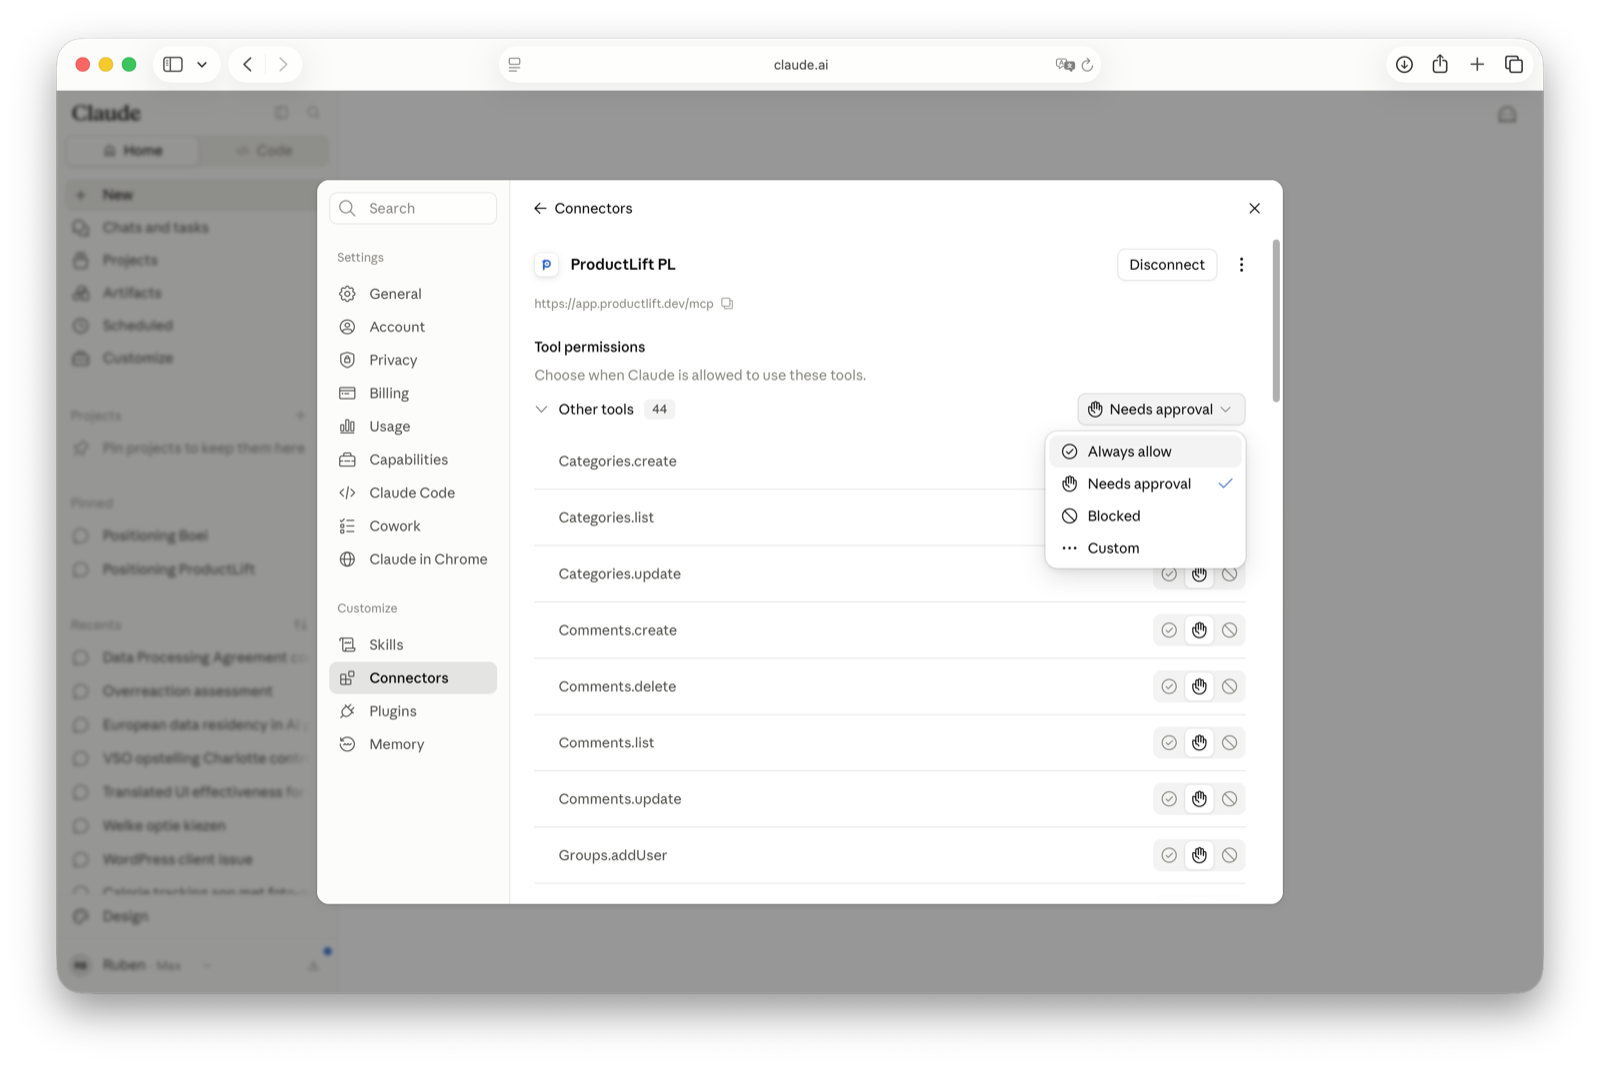
After you approve, Claude.ai discovers every tool the connector exposes (posts, comments, votes, statuses, etc.). Use the tool permissions view to decide which ones run automatically and which require confirmation. We recommend leaving anything that deletes on "ask first".
Claude Desktop
Claude Desktop uses the same connector settings as Claude.ai. Open Settings → Connectors, click Add custom connector, paste https://your-portal.example.com/mcp, and follow the same steps as above. Claude Desktop opens the sign-in in its own browser window; after you approve, it stores the token and the connection persists across restarts.
ChatGPT
Custom MCP servers in ChatGPT require Developer mode, available on Plus, Pro, Business, Enterprise, and Edu plans. In a managed workspace an admin first has to allow custom connectors (Workspace Settings → Permissions & Roles → Connected Data).
- Open Settings → Security and login and turn on Developer mode. (Older builds keep this switch under Settings → Apps → Advanced settings.)
- Open Settings → Connectors and click Create. (Newer builds call this page Plugins, reachable at
chatgpt.com/plugins; click the plus button.) - Enter a name and a short description. ChatGPT reads the description when deciding whether to use the connector, so something like "Manage feedback posts, votes, and roadmap on our ProductLift portal" works well.
- Paste
https://your-portal.example.com/mcpas the MCP server URL and set Authentication to OAuth. - Create the connector. ChatGPT discovers your portal's OAuth settings, registers itself, and opens your portal so you can sign in and approve.
To use it in a chat, enable the connector under the tools (plus) menu of the conversation.
Claude Code
Add the server once for all your projects, then sign in from inside Claude Code:
claude mcp add --transport http --scope user productlift https://your-portal.example.com/mcpStart Claude Code, type /mcp, pick productlift, and choose Authenticate. Your browser opens for the sign-in. Drop --scope user if you only want the connection in the current project.
Cursor
- Open Cursor Settings → Tools & MCP (older versions: MCP) and click New MCP Server. This opens
~/.cursor/mcp.json. - Add the server:
{
  "mcpServers": {
    "productlift": {
      "url": "https://your-portal.example.com/mcp"
    }
  }
}- Back in the settings list the server shows Needs login or Connect. Click it, sign in to your portal, and approve.
VS Code
- Open the Command Palette and run MCP: Add Server.
- Choose HTTP (HTTP or Server-Sent Events), paste
https://your-portal.example.com/mcp, name itproductlift, and pick Global so it is available in every workspace. - VS Code asks whether to allow the server to authenticate. Allow it, sign in to your portal, and approve.
This writes the entry to your user mcp.json. If you prefer to add it by hand, or want to share it with a team in .vscode/mcp.json:
{
  "servers": {
    "productlift": {
      "type": "http",
      "url": "https://your-portal.example.com/mcp"
    }
  }
}
Gemini CLI
Add the server to ~/.gemini/settings.json:
{
  "mcpServers": {
    "productlift": {
      "httpUrl": "https://your-portal.example.com/mcp",
      "oauth": { "enabled": true }
    }
  }
}
Start Gemini CLI and run /mcp auth productlift. Your browser opens for the sign-in. Run the same command again if the token ever expires.
Windsurf
Windsurf (also sold as Devin Desktop) keeps its MCP servers in ~/.codeium/windsurf/mcp_config.json. Open it from the MCPs icon in the top right of the Cascade panel (or Settings → Cascade → MCP Servers) and add:
{
  "mcpServers": {
    "productlift": {
      "serverUrl": "https://your-portal.example.com/mcp"
    }
  }
}
Save and refresh the MCP list. Windsurf opens your portal in the browser for the sign-in. Note the key is serverUrl, not url.
Zed
- Open Settings → AI → MCP Servers (or run
agent: open settingsfrom the command palette and choose MCP Servers). - Click Add Server, then Add Remote Server, and paste
https://your-portal.example.com/mcp.
Or add it to your Zed settings.json by hand:
{
  "context_servers": {
    "productlift": {
      "url": "https://your-portal.example.com/mcp"
    }
  }
}
Because there is no Authorization header configured, Zed prompts you to sign in to your portal the first time it connects.
Cline
- Click the MCP Servers icon in the Cline panel and open the Remote Servers tab.
- Enter
productliftas the server name,https://your-portal.example.com/mcpas the server URL, and choose Streamable HTTP as the transport type. - Click Add Server. Cline opens your portal in the browser for the sign-in.
The entry in Cline's cline_mcp_settings.json looks like this. The transport type must be spelled streamableHttp exactly, otherwise Cline falls back to the older SSE transport, which the portal does not serve:
{
  "mcpServers": {
    "productlift": {
      "type": "streamableHttp",
      "url": "https://your-portal.example.com/mcp"
    }
  }
}
Browser sign-in for remote servers arrived in Cline in August 2026, so update Cline if you see no sign-in window.
Goose
- In the Goose desktop app, open the sidebar, click Extensions, then Add custom extension.
- Choose Remote Extension (Streamable HTTP), name it
productlift, and pastehttps://your-portal.example.com/mcpas the endpoint. - Save. Goose opens your portal in the browser for the sign-in.
From the terminal, run goose configure, choose Add Extension, then Remote Extension (Streamable HTTP), and enter the same URL. Goose registers itself with your portal automatically, so leave client ID and secret empty.
Other MCP-compatible clients
Continue, JetBrains AI Assistant, Perplexity, Raycast, and most other AI tools that support remote MCP servers work the same way: look for "MCP server", "remote server", "connector", or "extension" in the client's settings, paste https://your-portal.example.com/mcp as the server URL, choose Streamable HTTP if asked for a transport, and choose OAuth if asked for an authentication type. The client discovers the OAuth endpoints via the two well-known documents and prompts you to log in. If the client offers no way to sign in through the browser, it cannot connect to ProductLift yet.
What the AI can do
The MCP tool list is generated from the same OpenAPI spec that powers the REST API docs. Anything the API can do, an MCP client can do, including:
- List, create, update, and delete posts
- Change post status, category, tags, and assignees
- List and post comments
- List and cast votes (including vote-on-behalf of end users)
- Manage statuses, categories, tags, and boards
- List and update users
Each tool carries a machine-readable description and an example payload so the AI does not have to guess parameter shapes.
Permissions and audit
MCP calls are attributed to the user who approved the connection. If that user only has member access, the AI can only see what a member sees. If they have admin access, the AI can perform admin actions. Every action taken shows the same author, activity trail, and notifications as if the user had done it themselves in the UI.
To revoke access, remove the token from the OAuth clients list in your portal, or revoke it from the client side.
Troubleshooting
- 401 Unauthorized on
/mcp: the access token is missing, expired, or was issued for a different portal. Reconnect from the client to trigger a fresh OAuth flow. Method Not Allowedon GET/mcp: this is expected. The endpoint only accepts POST. Some clients send a GET liveness probe on connect; the JSON-RPC error response is the correct behaviour.- Codex lists the server but shows no tools: the sign-in did not complete. Run
codex mcp login productliftin a terminal, then restart the app or extension. - ChatGPT has no Create button on the connectors page: Developer mode is off, or your workspace admin has not allowed custom connectors. See the ChatGPT steps above.
- Client can't find the OAuth endpoints: check that your portal hostname resolves publicly. MCP clients cannot use hostnames only reachable behind a corporate VPN unless the AI itself runs inside the same network.